EVA Pro - Quick Start - EVA PRO device set up and health check
How to set up my EVA PRO device
- EVA Pro Product Overview
- How supplied
- Battery Handling
- Turn on the device
- Connect your EVA Pro device to a WiFi network
- Time Zone set up
- Check for EVA APP Update
- Connecting EVA Pro to a stand
EVA Pro Product Overview
Thank you for purchasing an EVA Pro device, by MobileODT Ltd. Please read EVA Pro Instructions For Use carefully before using your device.
EVA Pro - Next Gen Digital Colposcope, a complete digital solution for magnified visualization and documentation. The EVA Pro is light weight and mobile, providing an outstanding image quality with superior software capabilities. This unique combination allows you to document and track the full treatment process and store it on the cloud.

.jpeg?width=572&height=434&name=rtaImage%20(6).jpeg)
EVA Pro device
How supplied
The following components are included with the MobileODT EVA Pro:- EVA Pro Digital Colposcope Device
- Two Removable Lithium Ion Battery Packs
- Charging Base with A/C Adapter plus EU, UK, AU plugs
- Hard Shell Carrying Case
- Stand Connector
- Instructions for Us

.jpeg?width=250&height=233&name=rtaImage%20(1).jpeg)
Battery Handling
- Before using the EVA Pro, the battery should be charged. Full charge is recommended but not required.
- If the battery is not already installed, insert a charged battery into the handle of the unit. The battery can only be inserted in a single orientation. Push the battery into place until the locking tabs snap; these tabs lock the battery into the handle.
- The battery is removed by compressing the two locking tabs on the sides near the battery base releasing the lock and, while firmly holding the unit head, pulling the battery down and out of the handle
.jpeg?width=349&height=263&name=rtaImage%20(2).jpeg)
EVA PRO Battery
Recharging the batteries
- Batteries should only be recharged when the battery and charger are dry
- Plug the battery into the charging adapter.
- Plug the charging adapter into an A/C outlet
- The red ‘charging’ LED on the charger should illuminate
- A completely discharged battery should fully recharge in about two (2-4) hours.
- The EVA Pro batteries are lithium-ion batteries
- and cannot be charged while connected to the EVA Pro handle. The EVA Pro handle cannot be connected to supply mains.
.jpeg?width=381&height=371&name=rtaImage%20(3).jpeg)
Battery Charging
Turn on the device
Press once on the Activation Button to turn unit on..jpeg?width=270&height=93&name=rtaImage%20(4).jpeg)
Activating the EVA PRO
The device will power on and the display will boot will show a boot logo..jpeg?width=204&height=362&name=rtaImage%20(5).jpeg)
If the battery is low upon startup, the device will show low battery on the display, then shut down.
Connect your EVA Pro device to a WiFi network
On the Get Started screen tap on the Wi-Fi button
.jpeg?width=253&height=452&name=rtaImage%20(7).jpeg)
A list of available WiFi networks is displayed. Tap on your local secured Wifi network, enter the password if needed, and tap on CONNECT.
Once connected, tap on the back arrow, located on the top left of the screen, to return to the Get Started page.
Time-Zone set up
The next step is to set up the time, date and time zone on your device to your local time.
Tap on Settings

Swipe up and tap on System

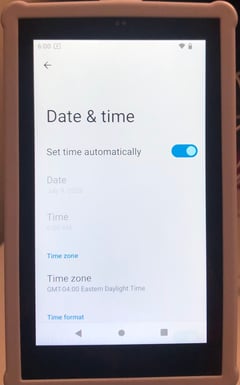
Tap on Date & Time

To select your local time zone - Tap on Time zone, and then tap on Region.


Select your local region and time zone in the drop down list

To return to the Date & Time screen, tap the back arrow at the top left corner

Make sure your Date, Time, and Time Zone are correct, and that 'Set time automatically' is enabled

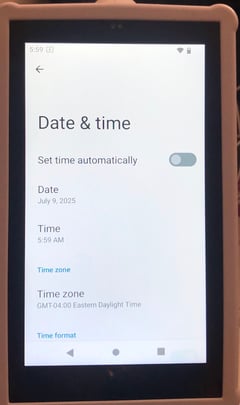
If the time, date or time zone are Incorrect or WiFi connection is failed, follow these steps:
- Disable Set time automatically

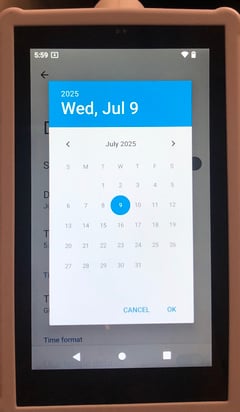
- Manually update the Date

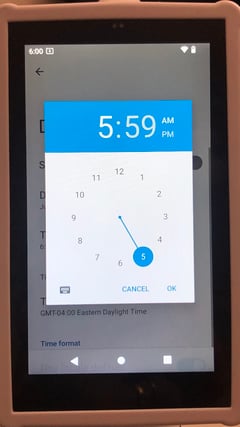
- Manually update the Time

- Re-select the Time Zone
- Re-enable Set time automatically

Check for EVA APP Update
Note, EVA App is updated automatically. For new delivered devices it is recommended to check for updates manually.- Tap on Settings
- Swipe up and tap on System
- Tap on Additional system updates
- Tap on CHECK FOR UPDATES
- If a new update is available APPLY button will be active.
- Tap on APPLY. Wait for update to complete.
EVA Pro Stand
Together with your EVA System, MobileODT provides a device stand for stabilizing the colposcope while capturing an image. There are two types of stands: a wheeled stand and a portable stand. Below are basic instructions on connecting the colposcope to a stand. See the detailed assembly instructions that came with the stand itself for further explanations.
- Wheeled Stand: The wheeled stand arrives in two distinct parts: the base and the pole. During the exam, the stand wheels should be locked manually to improve stability and limit motion blur.
- Portable Stand: The portable stand also enables a hands-free examination. This stand can be carried from location to location, can be folded for portability between exam rooms, or put into the accompanied carrying case to move between clinical sites.
.jpeg?width=384&height=524&name=rtaImage%20(25).jpeg)
EVA PRO connected to wheeled stand
.png?width=500&height=131&name=horiz-onwhite-noslogan%20(1).png)