Quick Start - Set up the EVA Plus device
How to set up my EVA Plus device
Please find step by step guide on how to get your EVA Plus running for the first time.
- Charging the Optical Unit and the Mobile Device
- Connecting the EVA Plus Device to Wi-Fi
- Updating Device Policy and Activating Your App
- Set EVA Plus Device Time & Time Zone
- Screen Time Out: Set the inactivity time before screen lock to 10 minutes.
- Update the EVA App
Charging
The EVA Plus includes two components: the optical unit and mobile device. Each needs to be charged separately.
Charging the Optical Unit
To charge the optical unit, connect the Micro-USB charger to the unit’s right side charging port. Connect the cable to a wall socket with the proper USB-electrical port adapter.
 The charger included has two slots for USBs to allow charging in a single electrical outlet.
The Charge Indicator Lights can be found above the charging port on the front of the optical unit. When connected to the charger, the lights will turn on and turn green while charging.
Please Note: The colposcope cannot be used while charging, as the LED light will not be able to be switched on.
Charging the Mobile Device
- To charge the mobile device when it is fitted within the optical unit, connect the Micro- USB cable to the charging port built-in to the unit.
- To access the port, raise the charging port cover located above the LED light on/off switch.
- Connect the cable to a wall socket with the proper USB-electrical port adapter.
- The mobile device should be charged whenever the colposcope is not in use to ensure proper functionality during the examination.

Connecting the EVA Plus Device to Wi-Fi
Open your EVA Plus device.
Swipe your finger downwards from the top of the screen.
Tap the settings icon.

Tap Connections.

Tap Wi-Fi (make sure that the toggle is on)

Select the desired Wi-Fi network from the list. Enter the password for the Wi-Fi network. Tap CONNECT.


Once Wi-Fi is connected successfully, with internet connection, "Connected" appears under the Wi-Fi name.

Updating Device Policy and Activating Your App
Open the EVA device. From the home screen, tap on the 'MaaS360' app.

This will open the IBM MaaS360 App menu. Tap on 'Settings'.

Tap on the three dots located at the top right corner of the screen. This will open the options menu.

Select 'Update Device Data' from the options menu. You may see a message indicating that the device information is being updated.


Process Verification:
Within the MaaS360 App, under 'Settings' and tap on 'My Device'.
 Scroll down to the bottom of the page to locate the 'Policy' field. Confirm that the value displayed under 'Policy' is 'J530 (ver xx)'.
 Note:
Note:
The policy update process may take approximately 10 minutes to complete.
If the policy does not update within this timeframe, repeat the process.
If the issue persists, please contact customer support at support@mobileodt.com for assistance.
Set EVA Plus Device Time & Time Zone
Open your EVA Plus device.
Swipe your finger downwards from the top of the screen.
Tap the settings icon.

Scroll down and tap on "General management."

Tap on "Date and time." Disable "Automatic date and time." Tap on "Select time zone."

Tap on "Region." Search for your region and select it. Choose your Time zone.

Tap the back button.
Verify that the selected time zone is correct.
Ensure that the date and time are accurate.
Enable "Automatic date and time."

Your device will now maintain the correct time and time zone automatically.
Screen Time Out
Set the inactivity time before screen lock to 10 minutes:
- Open your EVA Plus device.
- Swipe your finger downwards from the top of the screen.
- Tap the settings icon.
- Tap on Display
- Tap on Screen timeout
- Select 10 minutes
Update the EVA App
Update EVA App from the App login page (recommended)
- Open the EVA App.
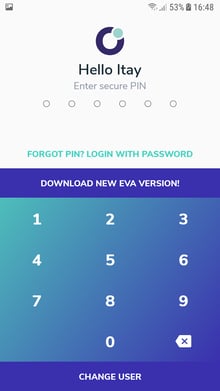
- On the Login secure PIN screen, tap on 'DOWNLOAD NEW EVA VERSION!'
- Follow the on-screen instructions to complete the update process.

Update EVA App from the Google Play.
Follow these steps only if, you failed to perform this from: 'DOWNLOAD NEW EVA VERSION!'
Open the EVA Device and go to home screen
Tap on MaaS360 App
Tap on App Catalog
Tap on the EVA App (blue round icon).
 In the EVA App information make sure the following appears: EVA Play: Health & Fitness
Tap on ‘READ MORE’. Tap on the play.google.com link.

Google Play - EVA App page is being opened.
Tap on UPDATE\INSTALL
When installation is completed the ‘OPEN’ button appears.

.png?width=500&height=131&name=horiz-onwhite-noslogan%20(1).png)